iPhone X Earpiece Speaker Replacement Without Losing Face ID


Introduction
Use this guide to replace the earpiece speaker without losing Face ID.
The earpiece speaker is only connected to the front sensor array by two solder points, so while this procedure does require a minimum amount of soldering, it is relatively easy to do and will allow you to keep the existing front sensor array and not affect the phone's ability to use Face ID.
In fact, you don't even have to remove the front sensor array to do this repair, making it actually easier than the full iPhone X Earpiece Speaker and Front Sensor Assembly Replacement guide.
This guide was inspired by a YouTube video by Tech MD Youtube who figured out how to do this procedure.
iPhone 11 Pro Max Ear Speaker and battery Replacement Keep Face ID Detailed - YouTube
Power off your iPhone before beginning disassembly.
Remove the two 6.9 mm-long pentalobe screws at the bottom edge of the iPhone.
Use a hairdryer or heat gun or prepare an iOpener and apply it to the lower edge of the iPhone for about a minute in order to soften up the adhesive underneath.
If the plastic depth gauge is attached at the center of the iSclack, remove it now—it's not needed for larger phones like the iPhone X.
Position the suction cups near the bottom edge of the iPhone—one on the front, and one on the back.
Press both suction cups firmly into place.
Hold onto your iPhone securely and close the handle of the iSclack to slightly separate the screen from the rear case of the phone.
Insert an opening pick into the gap.
Skip the next two steps.
If using a single suction handle, apply it to the bottom edge of the phone, while avoiding the curved portion of the glass.
Pull up on the suction cup with firm, constant pressure to create a slight gap between the front panel and rear case.
Insert an opening pick into the gap.
Slide the opening pick around the lower left corner and up the left edge of the iPhone, slicing through the adhesive holding the display in place.
Re-insert your pick at the bottom edge of the iPhone, and slide it up the right side to continue separating the adhesive.
Slide the opening pick around the top corner of the display, while gently pulling or wiggling the display down in the direction of the Lightning port.
Slide the pick to the opposite corner and cut any remaining adhesive securing the display.
Pull on the small nub on the suction cup to remove it from the front panel.
If you used an iSclack and it's still affixed to the iPhone, remove it now.
Open the iPhone by swinging the display up from the left side, like the back cover of a book.
Lean the display against something to keep it propped up while you're working on the phone.
Remove five Y000 screws securing the logic board connector bracket, of the following lengths:
Three 1.1 mm screws
One 3.1 mm screw
One 3.7 mm screw
Use the point of a spudger or a clean fingernail to pry the battery connector up from its socket on the logic board.
Bend the connector slightly away from the logic board to prevent it from accidentally making contact with the socket and providing power to the phone during your repair.
Use the point of a spudger or a fingernail to disconnect the front panel sensor assembly connector.
Remove the 1.2 mm Y000 screw on the back of the display assembly, near the infrared camera port.
Beneath the screw you just removed lies a small metal grounding clip. If it didn't already come out along with the screw, remove it now.
Remove two more Y000 screws securing the speaker/sensor assembly:
One 1.6 mm screw
One 1.3 mm screw
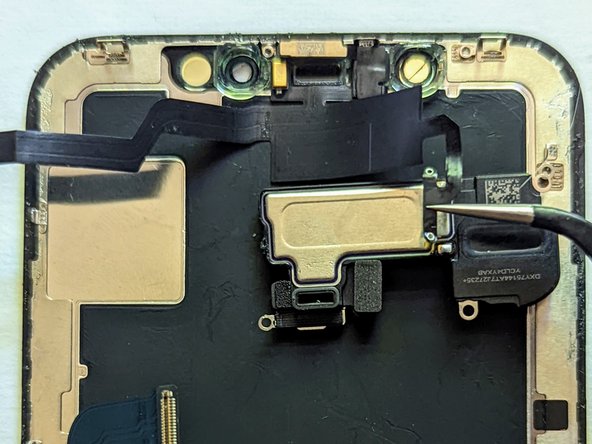
Using a spudger, gently pry under the top edge of the speaker assembly, and flip it over—down and away from the top edge of the display.
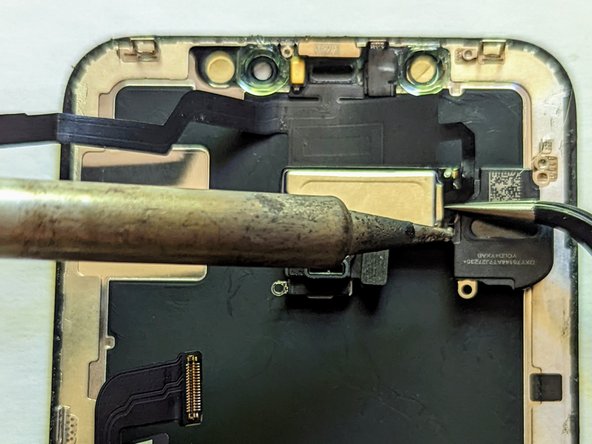
While holding the flex cable with a pair of tweezers, apply heat to the first solder pad. As soon as the solder melts, pull the iron away and lift the flex cable to keep it from re-adhering to the earpiece speaker when the solder cools.
Repeat for the other solder pad.


To reassemble your device, follow these instructions in reverse order.

Comments
Post a Comment